The Scooter Flies!
Published: Monday, 03 February 2014 08:15 | |  |
|  | Hits: 3081
| | Hits: 3081 | | Hits: 5939There's been talk of a one make fun competition over the last year or two, ever since the Plagiarist (the previous one-make model of choice) went out of production. More on this topic to be written elsewhere, but I thought I'd give one of the options a try.
I've noticed a lot of people flying the Phoenix Scanner over the past few years. A low wing "trainer" style of aircraft, ideal for a 40-something glow motor and 4 channel control. Without exception, everyone seemed to like the scanner, and Neil Waterhouse has been flying the skin off his for a very long time (I now know that he is currently flying the skin off his 3rd Scanner - he likes them that much).
Here's an image of the Scanner - courtesy of Duane's Planes - one of the places where you can get a Scanner. She ain't pretty, but she makes up for it in other ways - read on:

So I picked up Scanner from Hobbyland in Hornsby (on impulse, I was there to buy piano wire) for the princely sum of $127, and set about building it...
...which didn't take long at all. The aircraft is pretty much fully assembled, the control surfaces are all hinged and fitted, with all hinges pinned very neatly. The engine mount is pre-installed, with lock washers on the fittings, and the firewall has a sponge ring on the inside of the aircraft for the tank to push against to help prevent vibration, to mount the tank firmly and to stop it sliding forward and creasing the pipes.
The tail went in very smoothly, the film covering is very good, and the component fit is excellent (no wrestling with the wing halves to get them to join perfectly - they were made for each other). The control horns supplied are of good quality, and the only parts that I replaced were the plastic clevises - I prefer to use metal ones.
The aircraft needs 4 servos - one each for elevator, rudder, aileron and throttle. I used standard servos for aileron and rudder, a mini servo with metal gears for throttle, a HiTec HS645MG (metal gear) for the single aileron servo (this is the only design weakness, in my view - I dislike single servos for aileron control and would have modified the model to take 2 aileron servos if I wasn't trying to keep it as standard as I could).
The undercarriage is a tricycle set up. The legs go into slots in a hardwood bearer in each wing, and go up into a snug fitting hole to keep them straight. I always use a soft setting glue in the slots to help the legs (my preference is a foaming glue that fills the space and gives them a buffer).
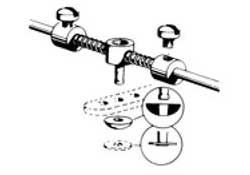
The steerable nose wheel was good quality, and I did use an extra servo here as I figured my Scanner would do a lot of landings and I don't like risking the stress from the nosewheel on the gears of the rudder servo - so despite wanting to keep standard, I decided to bend my own rules. I used a servo-saver technique that I'd read about, using a couple of bits of soft tube...here's an image (using springs), again courtesy of Duane's Planes, where you can buy the DuBro version of this. Really neat:
I used a Sanyo Eneloop XX 5 call battery pack - 2500mah, or over 4 times what the original RX packs used to hold - and checked over all the glue joints etc as I assembled the plane. Mighty impressive - great quality all the way through and the sort of build and finish that I'd expect from a MUCH more expensive aircraft. I'm a fan of Phoenix planes anyway, and this one is top of the tree. I did brush in a bit of 5 min epoxy in a few places (firewall, the ply holding the wingnuts etc), but I suspect I could have left it how it came, with no ill effects.
For a motor, I used a very old OS46AX that I acquired 2nd hand several years ago in a badly thought-out trash and treasure purchase. I had to fit a bush-find OS silencer as the original purchase had a home made in-cowl silencer, and I used a Bolly 11X6 carbon propellor.
So, off to the field. Radio check, fuel in and the old OS burst into life despite having lost any last vestiges of compression many flights ago. I set her off slightly rich, ground handling was superb, take-off was easy, and a couple of clicks of down elevator, left aileron and one click of right rudder and she was flying beautifully.
So the maiden flight continued with inverted, rolls, loops, a few high G spinny/rolly things, lots of high speed passes (this thing is really quick - not a trainewr on full throttle, even on a tired old motor) and a nice gentle landing to follow.
Following a quick checkover, to make sure all was still tight and working as planned, she was fuelled and sent up again, for another 10 minutes of hooning, then a landing, absolutely no vices discovered, a joy to fly so...then more fuel, then a takeoff and then...
Kelvin and I were the onyy two people in the air. He was flying something fairly quick with an OS55 on a 12X5 prop, and it was clearly essential that we raced a few circuits to find out which aircraft/motor/prop was quickest. Egged-on by the front row audience in the geri shed, Kel and I raced closer and closer, turning tight, swapping the lead...
...until we "touched" the aircraft over the bush. The Scanner span straight in, and Kel landed his aircraft with significant damage (not least the undercarriage, which gave up as soon as it felt earth beneath it). The Scanner had found hard rock and a metal pole to cushion the plummet, and was destroyed - well beyond repair. Kel's aircraft might be repairable, but might not look quite as pretty afterwards. The chorus line in the geri shed sang, as one - "It was only a matter of time, I could see it coming, when will you young hooligans learn".
A very sad end to my Scanner. It took Kel and I a long time to stop laughing though, and we brought a little frivolity to the serious business of flying RC. I'm $127 and about 3 hours of building time down - and I'm going straight out to buy another Scanner. Bloody brilliant - I won't be without one of these in my shed!
| | Hits: 3206